 Summary. When managing a Microsoft Windows Server, one of the more common tasks is to use the Remote Server Administration Tools to manage users and computers.
The AD Users & Computers allows management of users, groups, organizational units, and all other AD DS objects.
Instructions for downloading, installing, and enabling are available on Microsoft’s website here:
- Windows 7
http://www.microsoft.com/en-us/download/details.aspx?id=7887
- Windows 8
http://www.microsoft.com/en-us/download/details.aspx?id=28972
There is one missing bit of information on that page that is probably the most important detail you’ll need.
Referring to the option to Turn Windows features on or off, step #8 reads, “Select the remote management tools that you want to install.”
As you’ll see, there are numerous items that can be installed/enabled. AD Users & Computers isn’t anywhere to be found in the list.
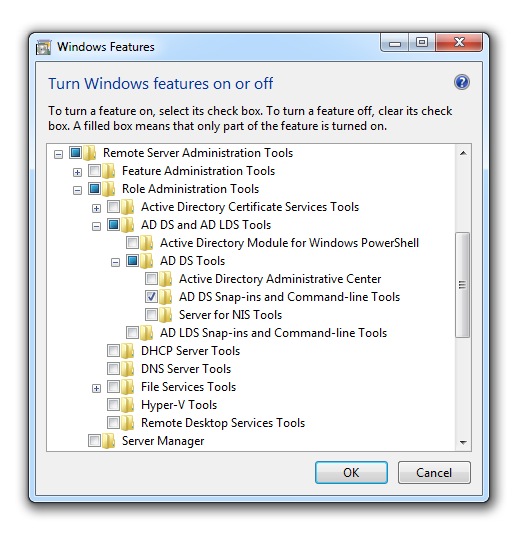
As shown below, within the Turn Windows features on or off dialog box. You’ll want to navigate to Remote Server Administration Tools > Role Administration Tools > AD DS and AD LDS Tools > AD DS Tools > and select AD DS Snap-ins and Command-line Tools. This will ensure that the AD Users & Computers icon will appear on your desktop.
Windows 8 Instructions
After installing the software as indicated above, all Remote Server Administration Tools will be selected and an Administrative Tools Tile (icon) will be added to your start screen. Click this, and on the list find Active Directory Users and Computers. Right click and drag this to your desktop (choose to copy the shortcut).
Windows 7 Instructions
Below are the instructions as provided by Microsoft.
Installing Remote Server Administration Tools for Windows 7 with SP1
You must be either a member of the Administrators group on the computer on which you want to install the Administration Tools pack, or you must be logged on to the computer by using the built-in Administrator account.
Important: Remove all versions of Administration Tools Pack or Remote Server Administration Tools from the computer before installing Remote Server Administration Tools for Windows 7 with SP1.
Important: Only one copy of Remote Server Administration Tools for Windows 7 with SP1 can be installed on a computer at one time. Before you install a new package, remove any existing copies of Remote Server Administration Tools for Windows 7 with SP1. This includes any copies that are in different languages. To remove existing copies of Remote Server Administration Tools for Windows 7 with SP1, see Removing the complete Remote Server Administration Tools for Windows 7 with SP1 pack on this page.
1. On a computer that is running Windows 7 or Windows 7 with SP1, download the Remote Server Administration Tools for Windows 7 with SP1 package from the Microsoft Download Center.
2. Open the folder into which the package downloaded, double-click the package to unpack it, and then start the Remote Server Administration Tools for Windows 7 with SP1 Setup Wizard.
Important: You must accept the License Terms and Limited Warranty to start to install the Administration Tools pack.
3. Complete all installation steps in the wizard, and then click Finish to exit the wizard when installation is finished.
4. Click Start, click Control Panel, and then click Programs.
5. In the Programs and Features area, click Turn Windows features on or off.
6. If you are prompted by User Account Control to enable the Windows Features dialog box to open, click Continue.
7. In the Windows Features dialog box, expand Remote Server Administration Tools.
8. Select the remote management tools that you want to install.
9. Click OK.
10. Configure the Start menu to display the Administration Tools shortcut, if it is not already there.
• Right-click Start, and then click Properties.
• On the Start Menu tab, click Customize.
• In the Customize Start Menu dialog box, scroll down to System Administrative Tools, and then select Display on the All Programs menu and the Start menu. Click OK. Shortcuts for snap-ins installed by Remote Server Administration Tools for Windows 7 with SP1 are added to the Administrative Tools list on the Start menu.
Reinstalling or removing individual Remote Server Administration Tools for Windows 7 with SP1
If a remote administration tool was removed from a computer that is running Windows 7 or Windows 7 with SP1, you can install it again by performing the following steps.
To reinstall individual remote administration tools:
1. Click Start, click Control Panel, and then click Programs.
2. In the Programs and Features area, click Turn Windows features on or off.
3. If you are prompted by User Account Control to allow the Windows Features dialog box to open, click Continue.
4. In the Windows Features dialog box, expand Remote Server Administration Tools.
5. Select the remote management tools that you want to install, or clear the check boxes for any tools that you want to remove. Click OK.
Removing the complete Remote Server Administration Tools for Windows 7 with SP1 pack
You must be either a member of the Administrators group on the computer from which you want to remove the Administration Tools pack, or you must be logged on to the computer by using the built-in Administrator account.
You can remove the complete Administration Tools pack from a computer by using the Uninstall a program utility in Control Panel.
To remove the Administration Tools pack
1. Click Start, click Control Panel, and then click Uninstall a program in the Programs area.
2. Click View installed updates.
3. Select Update for Microsoft Windows (958830).
4. Click Uninstall.
